Even though my depression has been hitting me very hard lately, I’ve managed to make progress with my sewing and knitting.
Capsule Sewing:
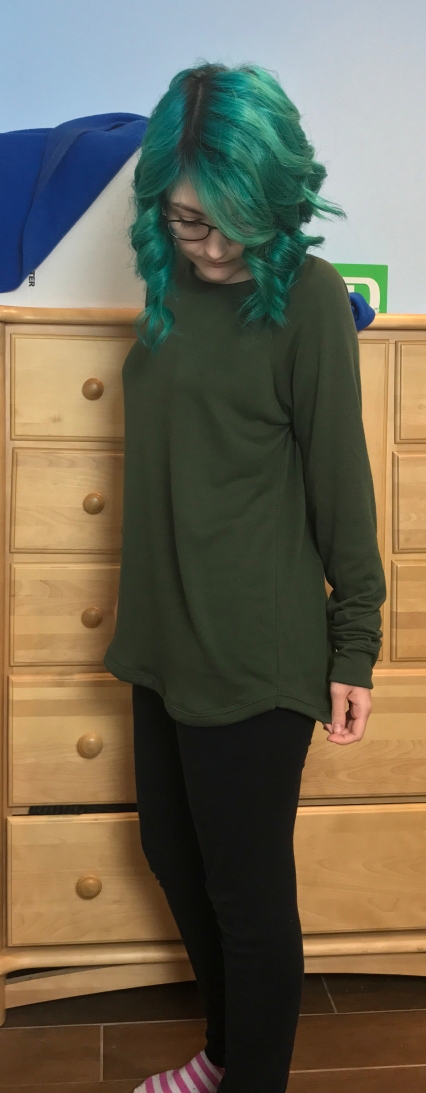
I finished the olive green Grainline Studio Linden Sweatshirt I had written about last week. I can definitely see myself living in this one all fall and winter.
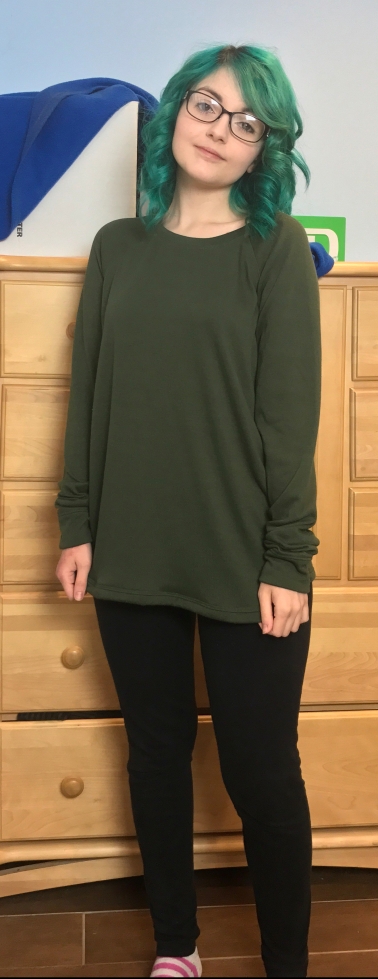
The fabric is a Hatchi Sweater Knit from Fabric.com in the color “sea weed”. This fabric is super soft and snuggly, but it’s also lightweight. So it’ll be warm enough for fall, but I’ll probably need to layer it with a cardigan for around the house in the winter  . I bought quite a few different colors of this Hatchi Sweater Knit last winter, so I’ll be working on using it this fall and winter for my capsule sewing.
I used the Grainline Linden sweatshirt, which has quickly become a favorite pattern of mine. It’s so simple and well drafted, but it’s also very versatile and hack-able (as you’ve seen with my other Linden variations: the split hem, banded short sleeves, etc.)

As with my first and second version, I cut the size 0 and graded up to a size 4 in the hips. I also added a bit of length to the body (maybe 2-3 inches?) and I curved the hem, which is definitely my preference for shirt hems! Instead of turning the hem up and top stitching it in place, I created a band/binding. I really like how clean this looks and it helps the hem lay flat and not flip up like just hemming curved hems usually do. Other than those little changes, I did nothing different than what’s in the pattern.
Other Sewing:
I finished a few new things for the shop and have some plans for other thing to add. I made another style of matching panties to make a set with a bra I’d made a little bit ago. I also made a sheer black mesh crop top for the shop and have a white one cut out and ready to sew.
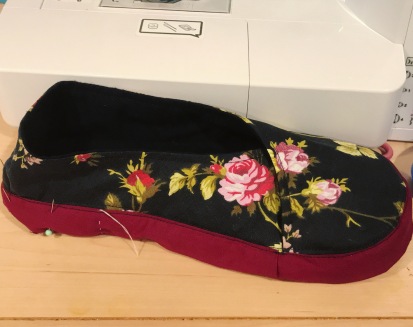
I’ve been working on a pair of slipped for my sister’s birthday. I have them mostly finished, I just need to do some hand sewing to finish them off. They have a removable heating insert, made from cotton and filled with rice so it can be popped in the microwave for 15-30 seconds and then popped into the slippers to keep her feet warm. The slippers are made from quilting cotton scraps and flannel scraps. I’m thinking of making other sizes of this and adding variations to the shop. Probably without the heat insert, at least until I can find a better way to do that. But for a prototype version of these, I think they’re coming along great.
Capsule Knitting:
I finally managed to finish that sweater I started back in February. I made it short sleeved, since it is a thinner/lighter weight sweater. I used the Pretty Mallory pattern (which is free and available on ravelry). I changed the sleeve design a little bit, when I picked up the sleeve stitches and started knitting the pattern, I started tapering the design so that it ended in a point rather than being a full panel on the top of sleeves all the way down.


 But for my first real sweater for myself, I think I did a darn good job. I’m not a huge fan of how high the neck it, so for my next sweater I will probably be doing short rows or something to help make the neck lower. I also wish I’d made it an inch or two longer, but it’ll work fine as is. My next sweater will also be made with thicker yarn… This one was out of a light fingering weight yarn… So I plan on working up a few worsted or DK weight sweaters next.


How has your week been? Has the change in seasons made your sewing mojo amp up, or has it fizzled out a bit? Personally, I love fall and so I’m very excited to be making things to wear for my favorite season.

Love your makes! I would love to know how you did that hem band! looks so proffesional!
LikeLike
Thank you! I actually used the neckband as a template. The bottom hem for both front and back, with the added curve, were wide enough for the largest length of the neckband, so I cut two of those. I applied the band to the bottom hems before sewing the side seams, and stitched it on like I would for the neckband, just flat instead of in the round, and then topstitched in place with seam allowance up towards the body. It was a lot simpler than I was thinking it was going to be!
LikeLiked by 1 person